How to Start a Blog in 10 Steps

A step-by-step guide to starting a blog and building a successful online presence — from picking a niche to monetizing your content.

microsoft edge qB249VQDUnE unsplash
Starting a blog is one of the most effective ways to build a profitable side hustle today. You can create a platform that not only showcases your passion but also generates a steady stream of income. Whether you’re into tech reviews, fitness tips, or personal finance hacks, there’s an audience waiting to connect with your content.
 
By the end of this guide, you’ll not only know how to set up your blog but also how to attract readers and monetize your efforts—even if you’re starting from scratch. Ready to turn your ideas into reality? Let’s get started.

How to Start a Blog in 10 Steps

Step 1: Choose a Niche

The first step in building a successful blog is finding the right blog niche idea. Choose something you’re passionate about and that has a clear audience. Ask yourself: What do I enjoy talking about? What problems can I help solve? The best niches balance your passion with audience demand and monetization opportunities.
 
When you’re brainstorming ideas, think about what excites you, what you’re good at, and what people might be searching for.

Here’s how to zero in on the perfect niche:

  • Brainstorm your interests: Write down 5-10 topics you’re passionate about.
  • Narrow it down: Get specific. Instead of “food,” think “vegan recipes for beginners.”
  • Check audience demand: Use tools like Google Trends or Answer the Public to research interest in your topic.
  • Evaluate profitability: Research how bloggers in your niche make money (e.g., affiliate links, ads, digital products).
  • Find your unique angle: Ask, “What makes my blog different from others in this space?”

Examples of profitable niches:

  • Personal Finance (e.g., budgeting, investing).
  • Fitness and Health (e.g., workout routines, diet plans).
  • Tech Reviews (e.g., gadgets, software).
  • Lifestyle (e.g., minimalism, travel).
 
By focusing on a niche that excites you and has growth potential, you’ll set your blog up for success from the start.

Step 2: Pick a Domain Name

Your domain name is your blog’s digital address and a key part of your brand. It should reflect your niche, be easy to remember, and resonate with your audience. A well-chosen domain makes your blog look professional and helps readers find you easily.
 
You can go two routes: a niche-specific name or a personal brand. Niche names like “BudgetEatsBlog.com” make your focus clear, while using your name—like “JohnSmithBlog.com”—builds personal connection and gives you the flexibility to cover multiple topics as you grow.

Quick tips for choosing a domain name:

  • Keep it short and simple.
  • Use a .com extension for trust and familiarity.
  • Avoid numbers or hyphens, which can confuse readers.
  • Ensure it’s unique and memorable.
To check availability, use a Domain search tool. If your ideal name is taken, try slight variations like adding “HQ” or “Blog” to your name. A great domain sets the foundation for your blog’s success, so take your time to pick one that aligns with your vision.

Step 3: Sign Up for Hosting

Your hosting provider is the backbone of your blog, ensuring it stays online and performs well for visitors. Hostinger is a great option for beginners, offering affordable pricing and easy-to-use features for managing your blog.

Get started with Hostinger:
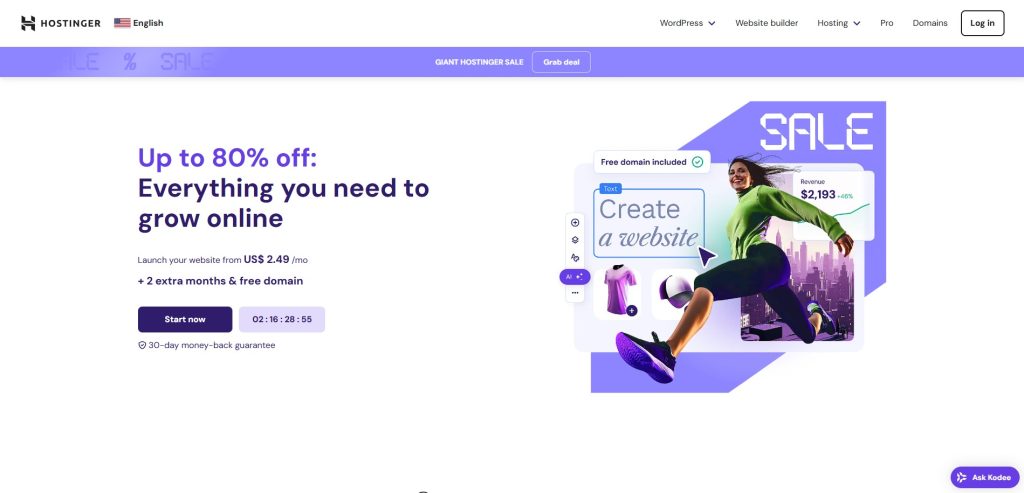
Hostinger 1

Go to Hostinger.com and choose your hosting plan. For beginners, the Premium Web Hosting plan is a popular choice, offering a free domain, SSL certificate, and email for $2.49 per month.
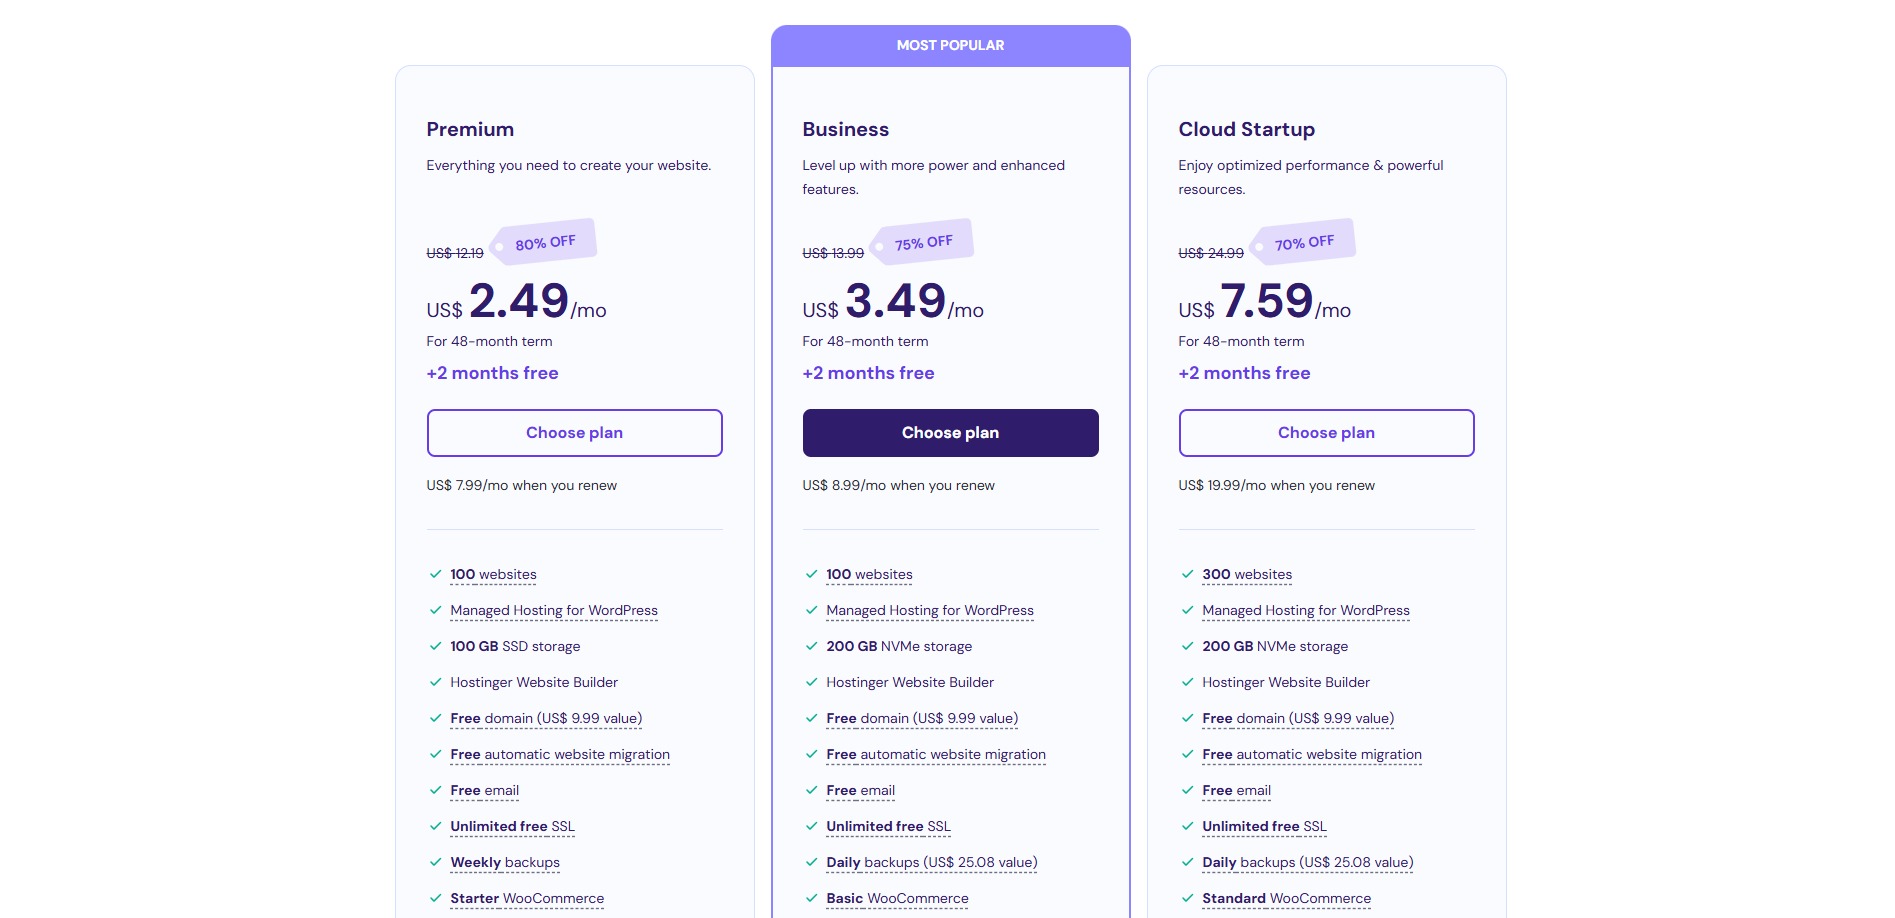
Hostinger 2

Click “Choose Plan” under the plan that best fits your needs. After choosing the plan you have to finalize your purchase.
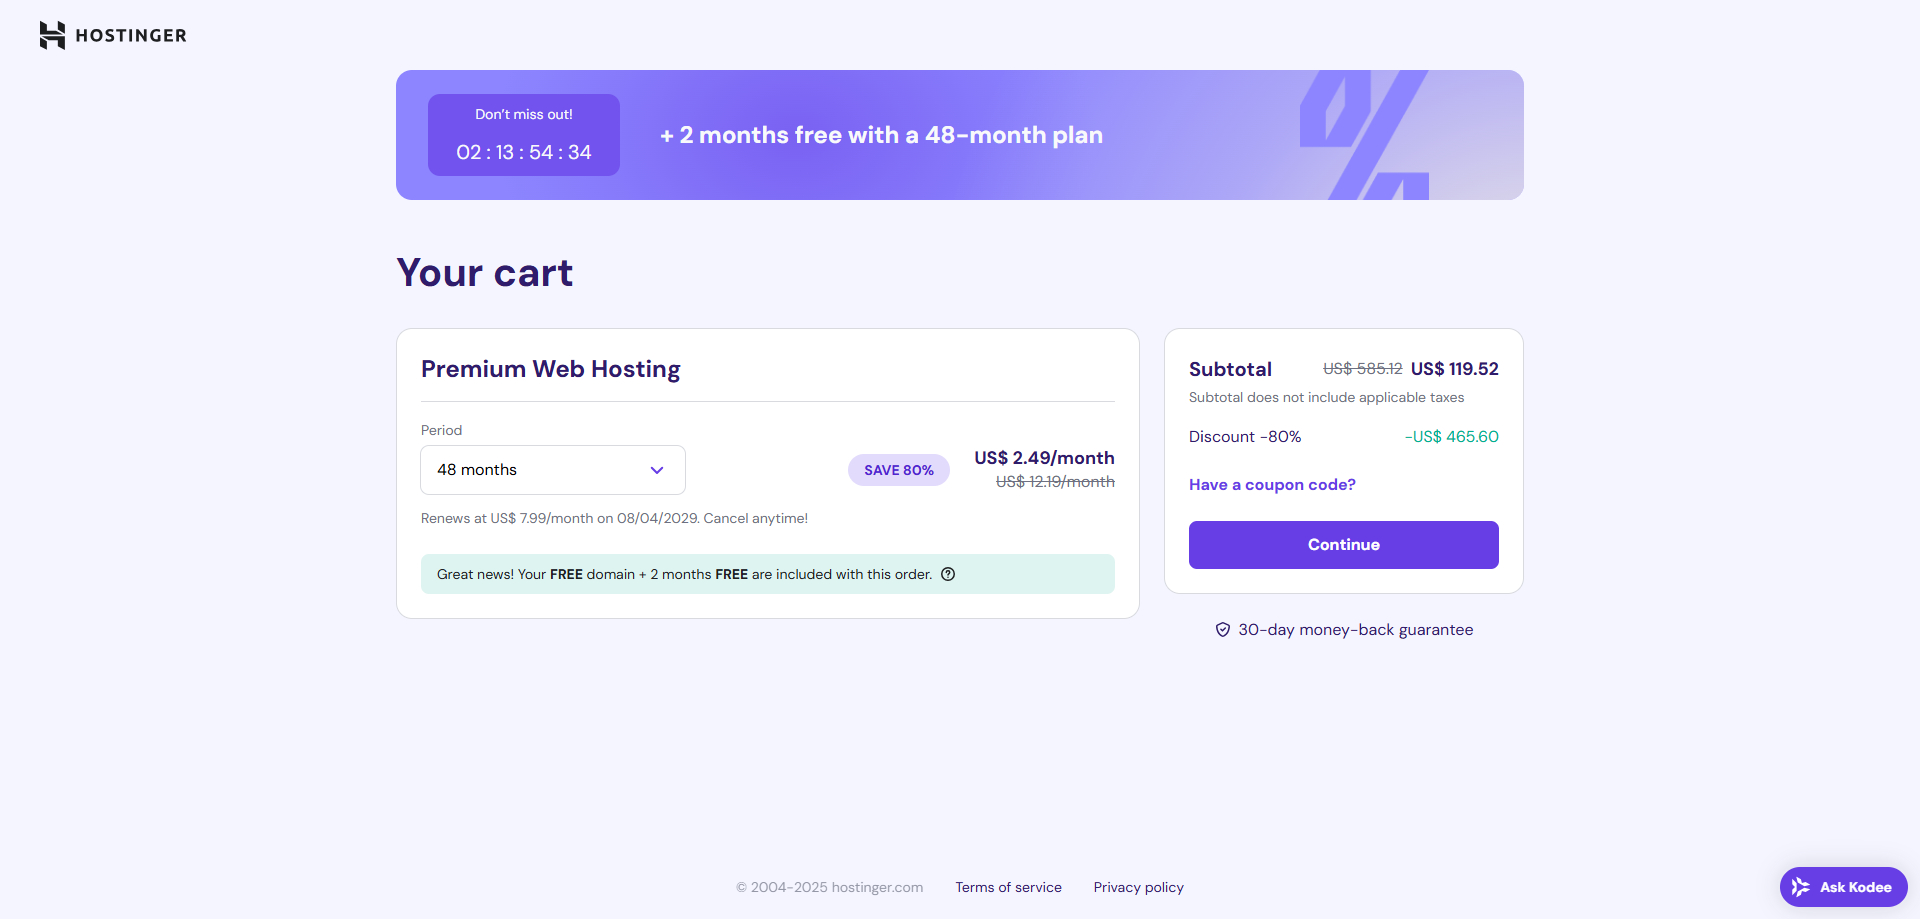
Cart Hostinger

After that, You have to enter your account details and sign up.

Hostinger lets you search for and register a free domain name after signup.

Once you’ve signed up, Hostinger provides a user-friendly dashboard to manage your hosting account and website setup.

Step 4: Install WordPress

Hostinger takes the technical hassle out of installing WordPress, offering a simple installation process. After signing up, follow these steps to set up your blog:

Log in to Your Hostinger Account: Use the credentials you created during the signup process to access your dashboard.

From the dashboard, Click on websites and continue.
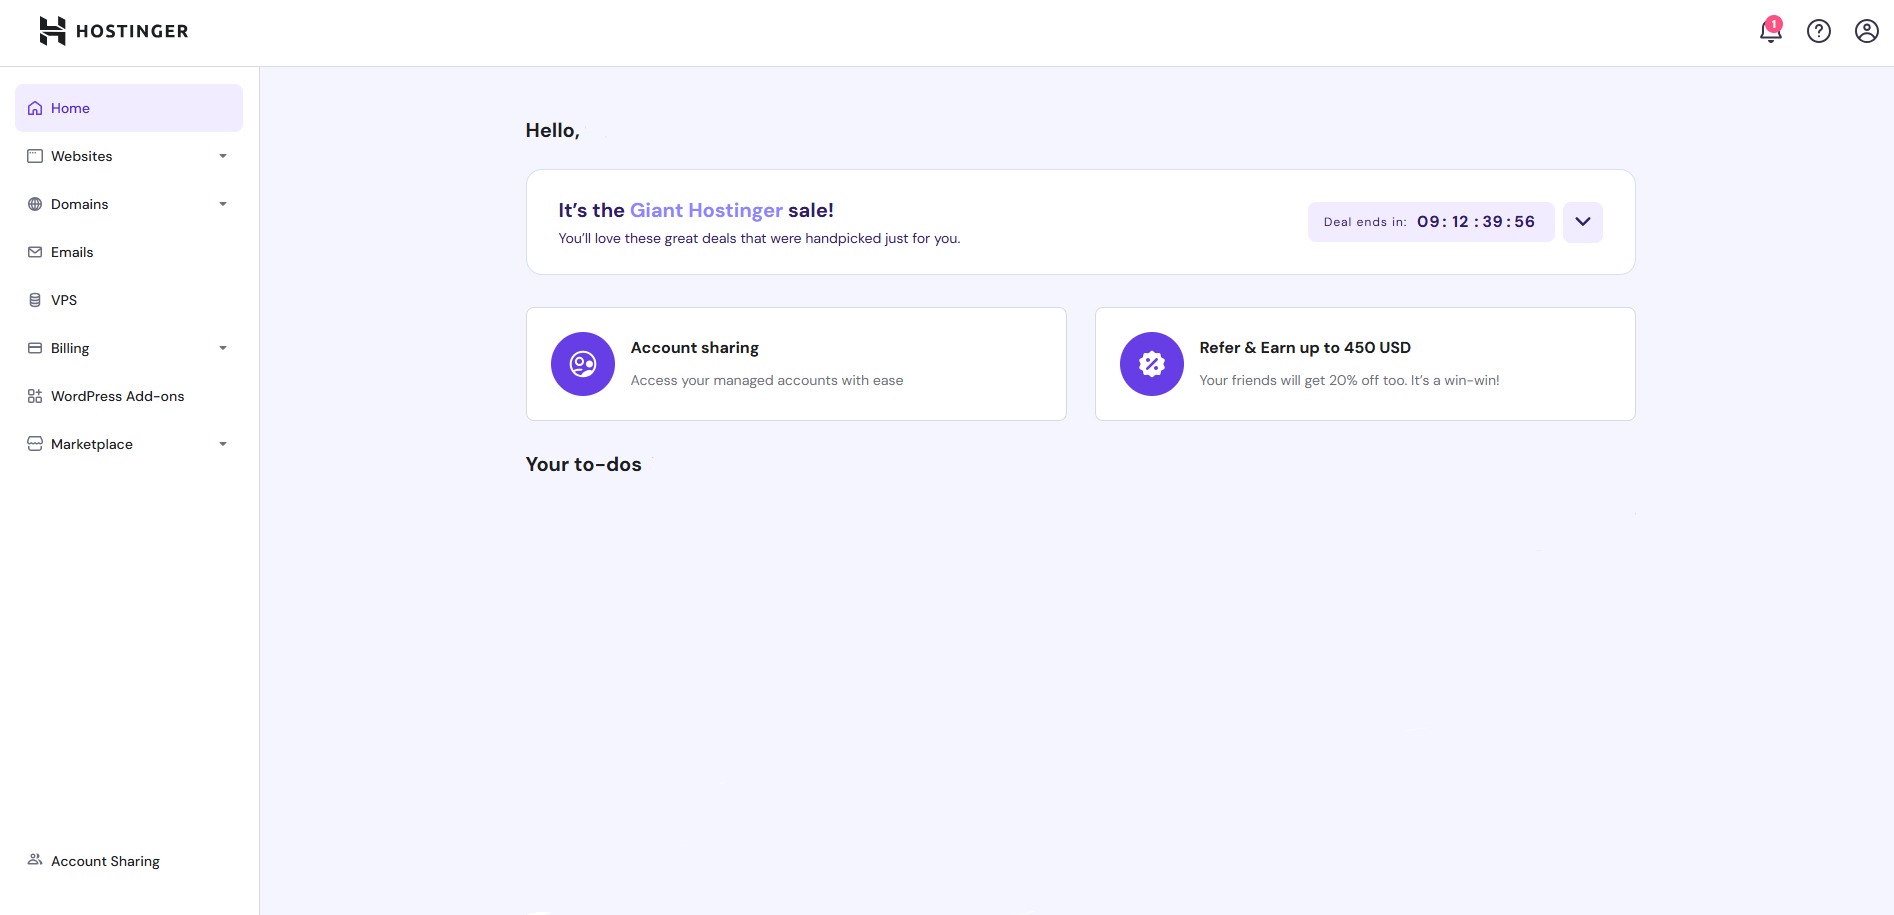
Home Hostinger

Click on Add website > WordPress and continue.
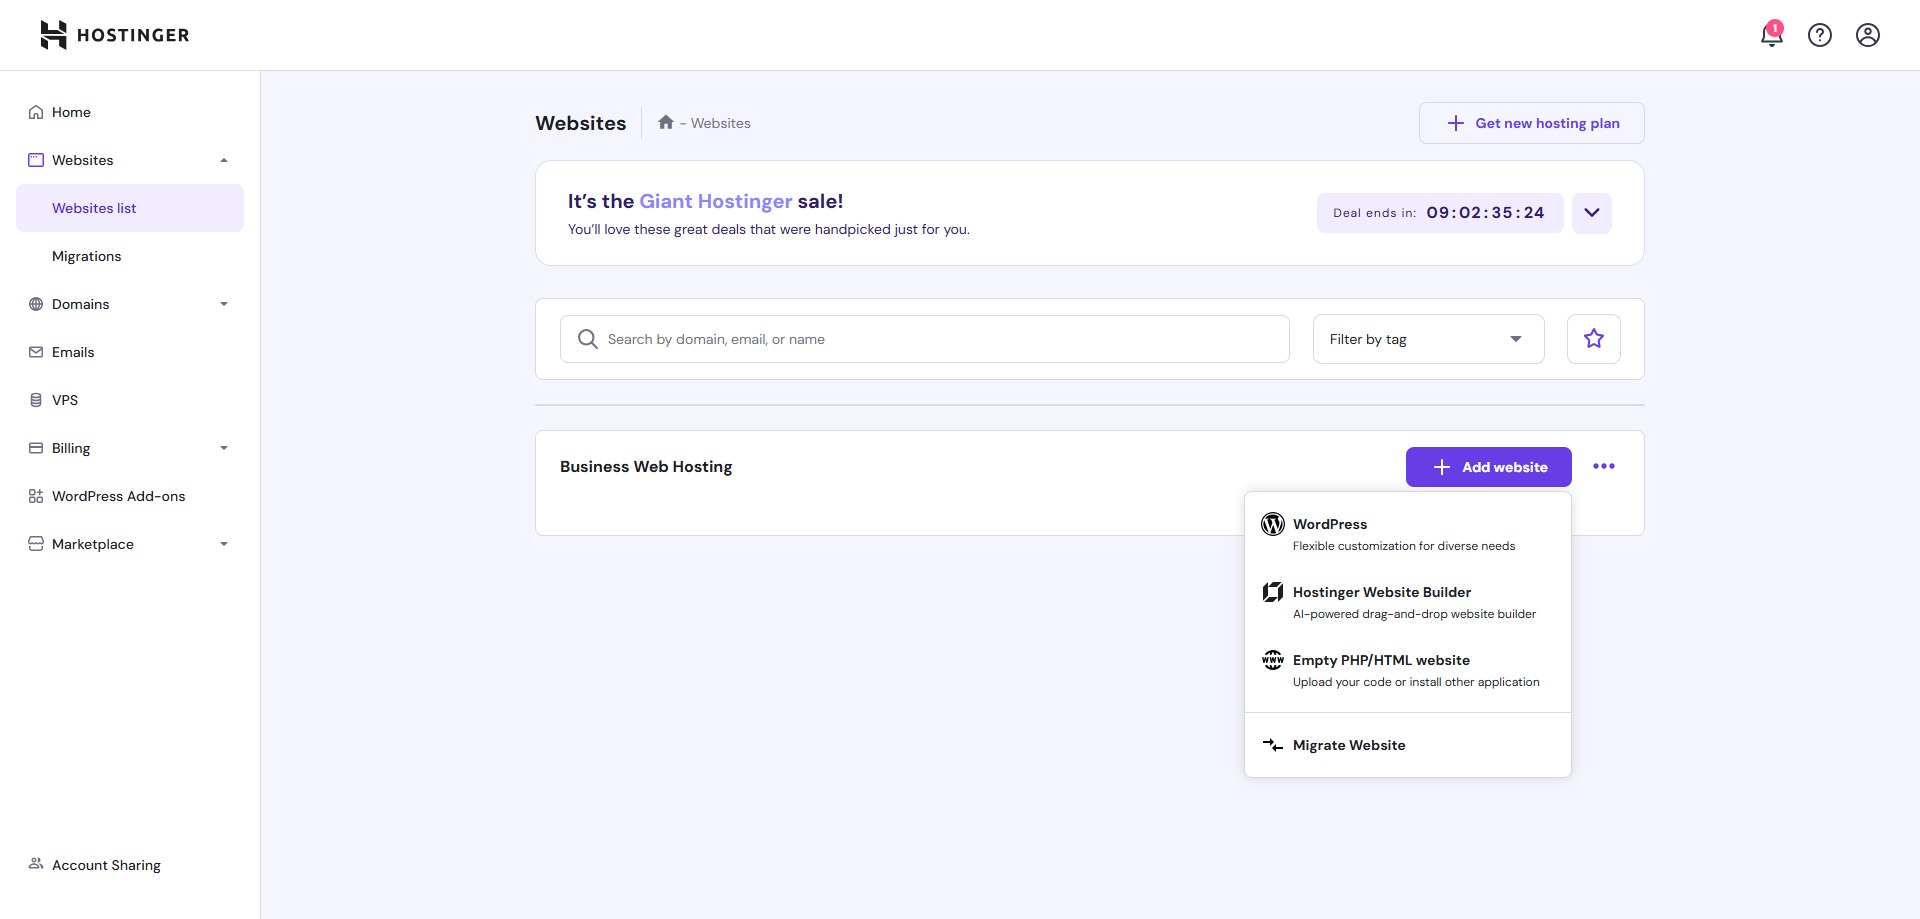
Websites Hostinger 1

After that Follow the Setup Wizard: Enter your blog’s name and tagline when prompted. Hostinger will automatically install WordPress and set up your website within minutes.

Once the installation is complete, Hostinger provides a link to your new WordPress site and login credentials for the WordPress dashboard.

Once installed, you’re ready to start designing your blog and adding the features that will make it stand out.

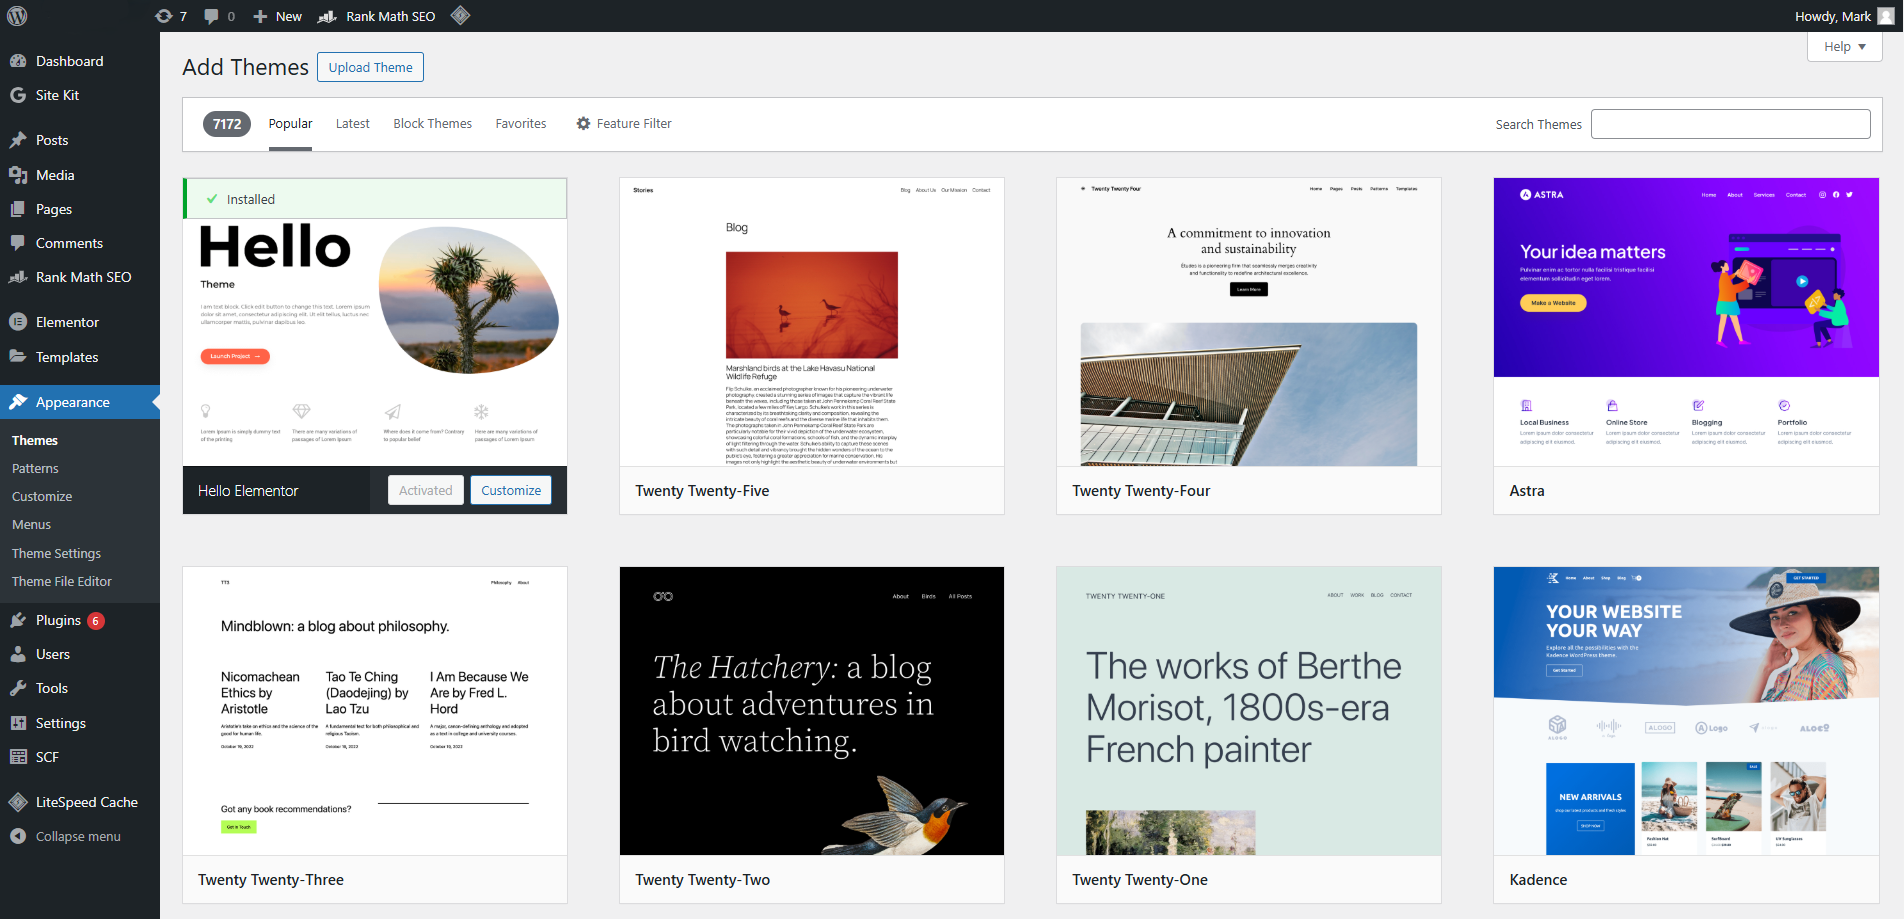
Step 5: Choose a Theme

Your WordPress theme determines how your blog looks and feels. It’s like choosing the outfit for your website—it defines its style, layout, and user experience. A great theme makes your blog visually appealing, easy to navigate, and aligned with your niche.
 
To choose a theme in WordPress:

Add Themes ‹ BuildFastWP — WordPress 12 21 2024 04 41 PM

  • Browse the free themes available or use the search bar to look for specific styles (e.g., “minimalist” or “magazine”).
  • Preview a few options to see how they look on your site.
  • Once you find the right one, click Install and then Activate.
 
If you want more customization or advanced features, consider a premium theme from marketplaces like ThemeForest. Premium themes often include better design options, faster loading times, and ongoing support. You could also use Elementor Pro to build one yourself.

Step 6: Customize Your Blog

Once you’ve installed a theme, it’s time to make your blog uniquely yours. Customization is where you fine-tune your blog’s design, layout, and functionality to reflect your brand and enhance the user experience. WordPress makes this process easy with its built-in Customizer and user-friendly plugins.
 
To start customizing:
  1. Access the Customizer: Go to Appearance > Customize in your WordPress dashboard.
  2. Edit site identity: Add your blog’s title, tagline, and favicon (the small icon that appears in browser tabs).
  3. Adjust colors and fonts: Most themes allow you to choose colors and fonts that align with your branding. Stick to a consistent style to maintain a polished look.
  4. Set up the homepage: Decide whether your homepage will display your latest posts or a static page. Many blogs use a static homepage with a call-to-action (like a newsletter signup) to engage visitors.
  5. Create menus: Organize your navigation menu by adding links to essential pages like “About,” “Contact,” and “Blog.”

Step 7: Install Plugins

Plugins are the tools that extend your blog’s functionality. They allow you to add features like SEO optimization, contact forms, social sharing buttons, and more—without needing any coding skills. Installing the right plugins can improve your blog’s performance, enhance user experience, and make managing your site much easier.
 
To install plugins in WordPress:
  • Go to the Dashboard: Log in and navigate to Plugins > Add New.
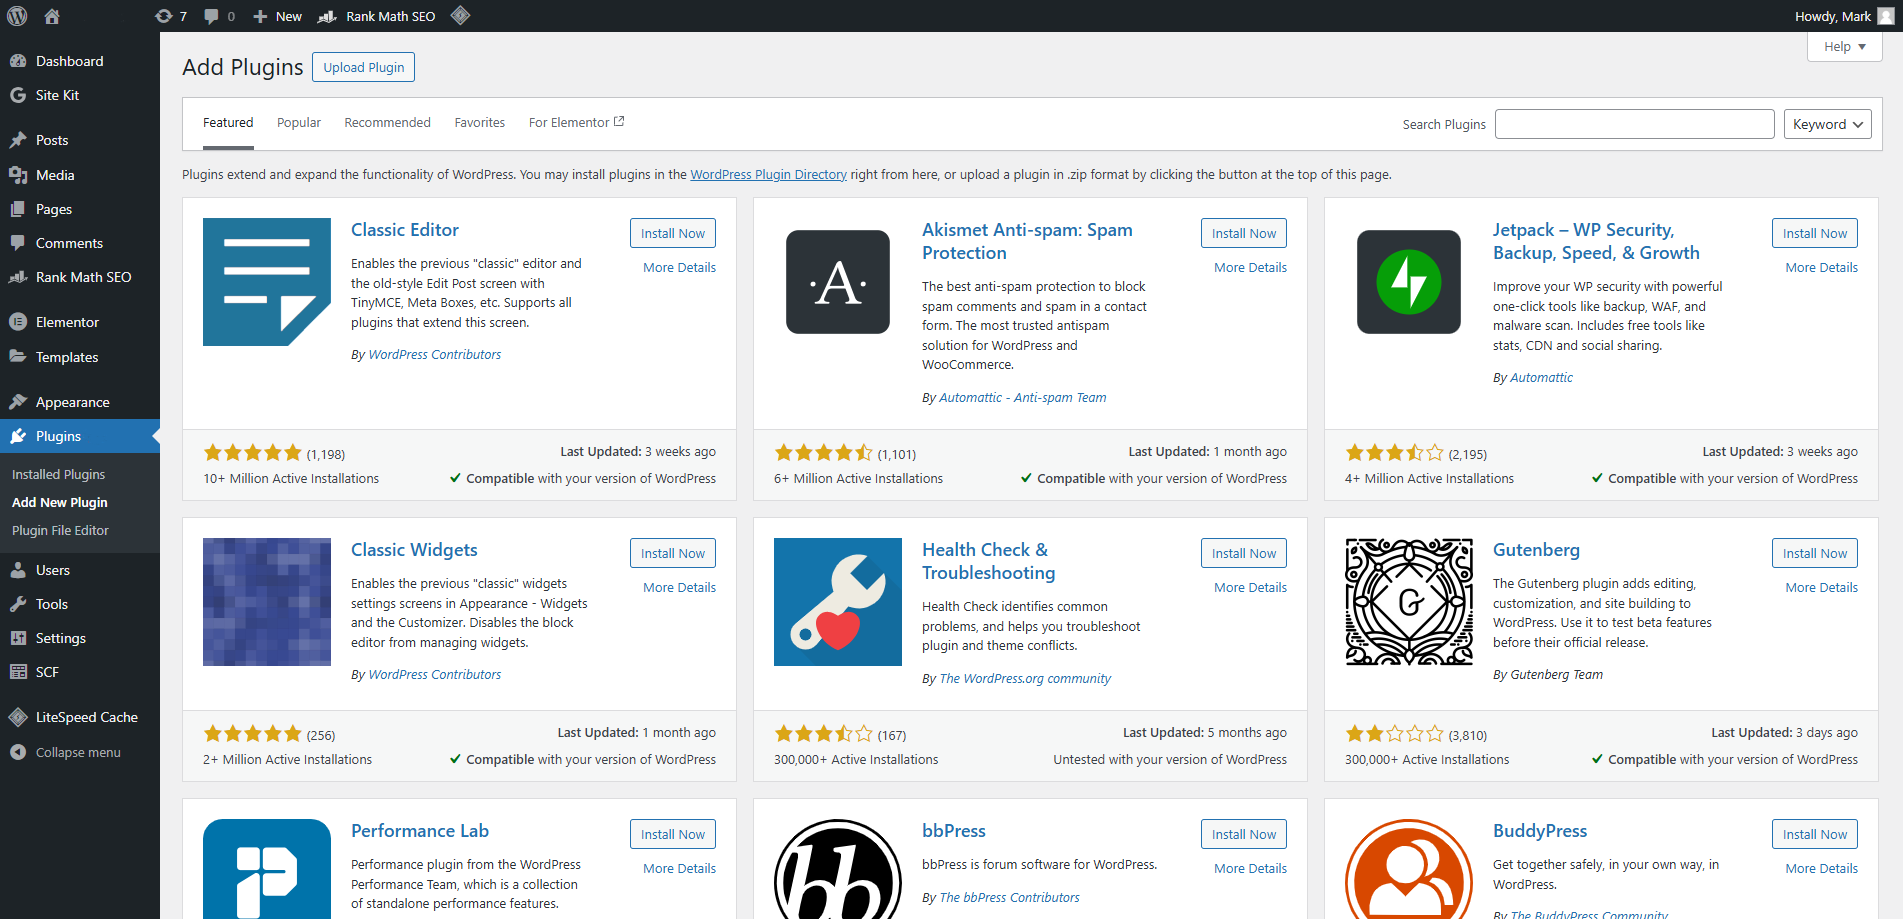
Add Plugins ‹ BuildFastWP — WordPress 12 21 2024 04 41 PM

  • Search for plugins: Use the search bar to find plugins by name or feature (e.g., “SEO,” “image optimization”).
  • Install and activate: Click Install Now on the plugin you want, then hit Activate once it’s ready.
 
Must-have plugins for your blog:
  • Yoast SEO: Optimize your posts and pages for search engines.
  • Akismet Anti-Spam: Protect your blog from spam comments.
  • Site Kit by Google: – Analytics, Search Console, AdSense, Speed
  • MonsterInsights: Track your blog’s performance using Google Analytics.
  • Smush: Compress images to keep your site fast and efficient.
  • UpdraftPlus: Automate backups to keep your blog safe in case of issues.
 
How to manage plugins effectively:
  • Only install what you need to avoid slowing down your site.
  • Keep plugins updated to ensure they work smoothly and securely.
  • Regularly deactivate and delete unused plugins to maintain site performance.
 
With the right plugins, you’ll have a powerful toolkit to grow your blog, attract readers, and manage your site effortlessly. Plugins transform a basic blog into a robust, professional platform.

Step 8: Write Your First Posts with Keyword Research and SEO
Now that your blog is set up, it’s time to create content. Your first posts will set the tone for your blog, establish your authority, and begin attracting readers. Writing engaging, well-researched posts is key, but equally important is making sure they’re optimized for search engines (SEO) to increase visibility.
 
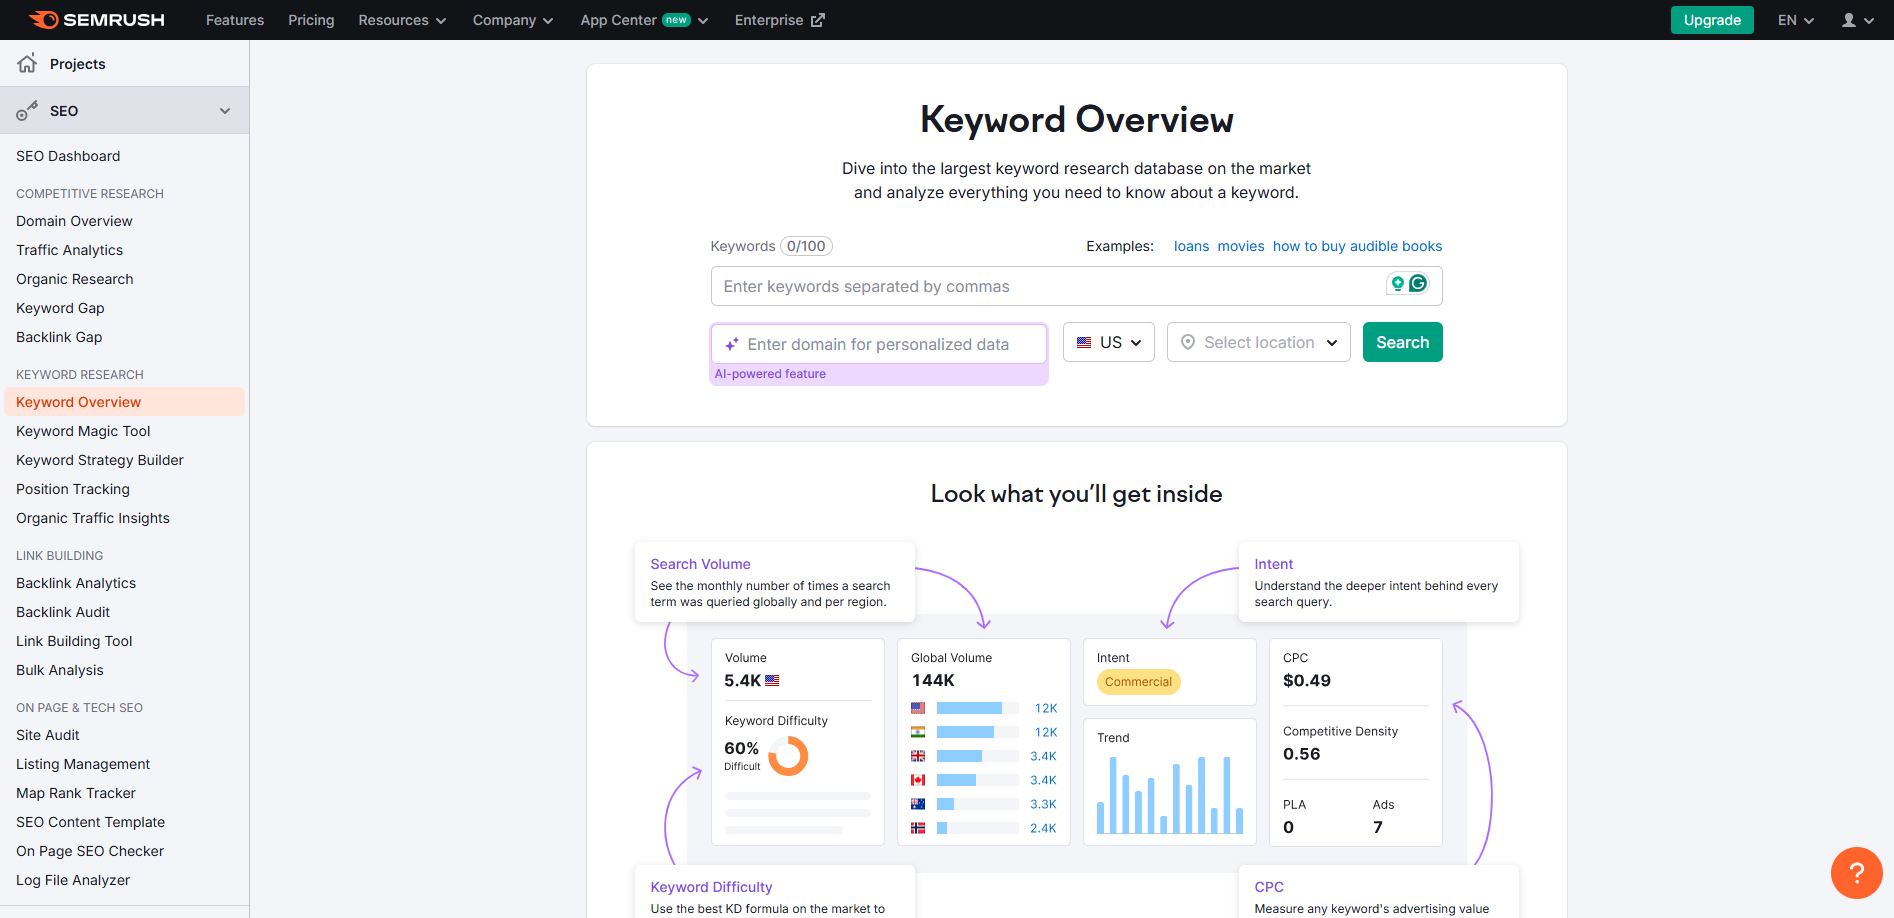
1. Conduct Keyword Research Keyword research helps you find topics your audience is searching for and ensures your content reaches them. Tools like SEMrush make this process simple:
Keyword Overview Discover New Ideas with Keyword Explorer 12 21 2024 02 47 PM e1734770912768
  • Enter your blog niche (e.g., “budget cooking” or “freelance writing”) into SEMrush.
  • Look for high-volume, low-competition keywords. For example, instead of targeting “fitness tips” (high competition), focus on something like “morning fitness routine for beginners.”
  • Build a list of 5–10 keywords to focus on for your first posts.
 
Pro tip: Use AI tools like ChatGPT or Jasper to brainstorm additional keyword ideas or generate outlines for your blog posts based on your chosen keywords.
 
 
2. Write High-Quality Content Craft engaging, useful posts that solve a problem or answer a question your readers have. For example, if your keyword is “easy vegan dinners,” your post could include recipes, step-by-step instructions, and personal tips.
  • Start with a catchy headline, like “10 Easy Vegan Dinners You Can Make in Under 30 Minutes.”
  • Use short paragraphs, bullet points, and subheadings to keep your post scannable.
  • End with a call-to-action (e.g., “Sign up for my newsletter for more vegan recipes!”).
 
AI tools can supercharge your content creation:
  • Use AI to brainstorm post ideas or generate drafts. For instance, ask ChatGPT to create a draft outline for “Best Budget Destinations in Europe.”
  • Try Grammarly to polish your writing and ensure flawless grammar.
 
3. Optimize for SEO SEO is how your blog gets found on Google. Use these tips to optimize your posts:
  • Include your target keyword in the title, headings, and naturally throughout the text. Leverage AI tools like Jasper or Surfer SEO to analyze your content for optimal keyword placement.
  • Use internal links to connect to other posts or pages on your blog.
  • Add alt text to images, describing their content for better accessibility and SEO.
  • Use a plugin like Yoast SEO to guide you through on-page optimization.
 
4. Publish and Promote Once your post is ready, hit publish! Share it across social media, email newsletters, and online communities where your audience spends time. Consistent promotion will help your content gain traction.
 
Writing your first posts is about more than just hitting publish—it’s about creating value, optimizing for search engines, and ensuring your blog appeals to readers and algorithms alike. With AI tools and solid SEO practices, you’ll be ready to attract readers and grow your audience from day one.

Step 9: Promote Your Blog

Creating great content is only half of the work; getting people to read it is the other. Promoting your blog ensures it reaches the right audience, builds traffic, and lays the groundwork for monetization. Strategic promotion, especially for new bloggers, is essential for gaining visibility and growing your readership.
 
1. Share on Social Media Social platforms like Instagram, Pinterest, Twitter, and Facebook are useful tools for promoting your blog. Each platform caters to different audiences, so choose ones that align with your niche:
  • Pinterest: Ideal for visually appealing niches like DIY, food, travel, or fashion. Create attractive pins linked to your blog posts.
  • Instagram: Share behind-the-scenes content, snippets from your blog, or tips in your niche. Use trending hashtags to reach new audiences.
  • Twitter: Engage with your niche community by sharing insights, participating in discussions, and linking to relevant blog posts.
 
2. Build an Email List Email marketing is one of the most effective ways to keep readers engaged. Offer a free resource (like an ebook or checklist) in exchange for email subscriptions, then use tools like Mailchimp or ConvertKit to send newsletters with blog updates.
 
3. Collaborate with Other Bloggers Networking with bloggers in your niche can expand your reach:
  • Guest post on established blogs to share your expertise and link back to your site.
  • Cross-promote each other’s content on social media or newsletters.
  • Join blogging communities or forums to connect with peers and learn from their strategies.
 
4. Leverage SEO for Long-Term Traffic Promoting your blog doesn’t always mean immediate results. Optimizing your content for search engines ensures that it continues to attract readers over time. Tools like SEMrush can help you track keyword performance and refine your SEO strategy.
 
5. Use Paid Ads Strategically If you have a small budget, invest in ads to drive targeted traffic to your blog:
  • Use Google Ads to appear in search results for specific keywords.
  • Try Facebook or Instagram Ads to reach users interested in your niche.
 
6. Engage with Online Communities Be active in forums, Facebook groups, or Reddit communities relevant to your niche. Share value by answering questions and participating in discussions, then subtly link to your blog when it’s helpful and appropriate.
 
7. Repurpose Content Turn blog posts into other content formats:
  • Convert tips into Instagram carousel posts or Pinterest graphics.
  • Create a YouTube video or podcast episode summarizing a post.
  • Share quick tips from your posts as tweets or TikTok videos.
 
Promoting your blog is a continuous process, but a mix of social media, SEO, email marketing, and networking will ensure your content reaches a growing audience. Over time, your efforts will build a loyal readership, driving traffic and income to your blog.

Step 10: Monetize Your Blog

Once your blog has a steady flow of traffic, it’s time to turn your passion into profit. Monetizing your blog can open up diverse income streams, from affiliate marketing to offering premium content. Your success lies in choosing strategies that align with your niche and audience.
 
1. Affiliate Marketing Promote products or services that fit your blog’s niche and earn a commission for every sale made through your referral links.
  • Join affiliate programs like Amazon Associates, ShareASale, or niche-specific networks.
  • Write product reviews, “best of” lists, or tutorials that incorporate your affiliate links.
 
Example: If your blog is about fitness, promote workout gear, supplements, or online fitness courses.
 
2. Display Ads Partner with ad networks like Ezoic, and Mediavine to display ads on your blog. You’ll earn money every time a visitor views or clicks on an ad.
  • As traffic grows, transition to higher-paying networks like Mediavine or AdThrive for better earnings.
  • Place ads strategically to avoid disrupting user experience.
 
3. Sponsored Posts and Brand Partnerships Collaborate with brands that align with your niche to create sponsored content.
  • Write product reviews, tutorials, or guides featuring the brand’s offerings.
  • Charge based on your blog traffic, domain authority, and audience engagement.
  • Build a media kit showcasing your blog’s reach and audience demographics to pitch to brands.
 
4. Sell Digital Products Leverage your expertise to create and sell downloadable products directly to your readers. Popular options include:
  • Ebooks: Share in-depth guides or tips in your niche.
  • Courses or workshops: Teach skills like photography, budgeting, or meal planning.
  • Templates and printables: Offer resources like budgeting spreadsheets or meal planners.
 
5. Offer Services If your niche lends itself to expertise, monetize by offering services.
  • Examples include freelance writing, coaching, graphic design, or consulting.
  • Use your blog to showcase your skills and attract clients.
 
6. Membership or Premium Content Set up a membership model to offer exclusive content to subscribers.
  • Use tools like Patreon or MemberPress to manage memberships.
  • Provide value-added content, like behind-the-scenes posts, advanced tutorials, or free downloads.
 
7. Sell Physical Products For niches like crafting, fashion, or fitness, consider selling physical products.
  • Open an online store with tools like WooCommerce or Shopify.
  • Market your products through blog posts and social media.
 
8. Launch a Newsletter with Paid Subscriptions Grow an email list and monetize it by offering a paid newsletter. Share premium insights, niche-specific tips, or in-depth guides exclusively for subscribers.
 
Tips for Monetizing Effectively:
  • Build trust with your audience before prioritizing monetization. Authenticity is key.
  • Diversify income streams for stability. Combine affiliate marketing, ads, and product sales.
  • Test different strategies to see what resonates best with your audience.
 
Monetizing a blog requires consistency, patience, and creativity. With a mix of the right strategies and quality content, your blog can become a sustainable side hustle or even a full-time income source.

Stay Consistent

Consistency is the backbone of successful blogging. Publishing high-quality content regularly keeps your audience engaged, improves your SEO, and establishes you as a reliable source in your niche. However, staying consistent doesn’t just mean posting often—it means delivering value with every post.
 
How to Stay Consistent:
 
  • Set a schedule: Decide whether you’ll publish weekly, bi-weekly, or monthly, and stick to it. Use tools like Google Calendar or Trello to plan ahead.
  • Batch content creation: Write and schedule multiple posts at once to stay ahead.
  • Track your progress: Use tools like Google Analytics to monitor traffic and understand which content resonates most with your audience.
  • Stay inspired: Continuously explore new ideas through keyword research, competitor analysis, or AI tools like ChatGPT for brainstorming.
 
Consistency builds trust, and over time, it will transform your blog from a hobby into a dependable source of income.

Conclusion

Starting a blog as a side hustle is one of the most rewarding ways to earn extra income while sharing your passions with the world. From choosing the right niche to creating valuable content, promoting your work, and monetizing strategically, every step brings you closer to building a sustainable online business.
 
The journey won’t always be easy, but with patience, dedication, and a willingness to adapt, your blog can grow into an asset that generates both financial and personal fulfillment. Whether you’re looking to supplement your income or create a full-time career, there’s never been a better time to start blogging.